Pea and Pistachio Chelow Rice

image

Lately, I have started to experiment with different ways of cooking rice. I’m in my thirties, so it seems like the right time. I can no longer get away with experimenting with blue hair, cocktails made from whatever bottles of drink were left behind from the last party or unsuitable romantic partners, so I have to make my own fun and embrace my sad hobbies. This chelow rice is a traditional Persian dish from Greg and Lucy Malouf’s beautiful book Saraban and it’s simply a foolproof way to cook perfect rice. There are quite a lot of instructions, and it’s a bit more complicated then your standard plain boil approach, or even Anna  Jones’ lovely ‘high heat, low heat, no heat’ method, but it is worth it for the fluffy but defined rice with the slightest bite that it yields. You can just use the method to make plain rice, with the butter and oil, and it will still be an outstanding dish.

Serves 4-6 as a side dish

Ingredients

  • 300g basmati rice
  • 2 tablespoons sea salt
  • 350g peas
  • 70ml rapeseed oil
  • 1 large Spanish onion, chopped
  • 1 tablespoon flour
  • 1 bunch of dill, chopped
  • 100g pistachio nuts
  • 40g unsalted butter
  • 1 garlic clove
  • 1 strip of lemon peel
  • Neutral oil e.g. sunflower or rapeseed

Method

  • Wash the rice in cold running water, and then leave to soak for 30 minutes in a large bowl of lukewarm water, stirring occasionally with your hand to loosen the starch.
  • Strain the rice and rinse again with warm water.
  • Boil two litres of water in a large saucepan, add the salt and then the rice.
  • Boil, uncovered, for five minutes.
  • Quickly blanch the peas in boiling water in a separate pan for thirty seconds then drain.
  • You can test the rice by biting into it, it should be soft on the outside but still hard in the middle.
  • Drain the rice in a sieve and rinse with warm water, then shake and toss it a few times to try and drain as much water out as you can.
  • Melt the butter in a small saucepan and add two tablespoons of warm water.
  • Heat the saucepan again over a medium heat and add the oil and two teaspoons of water (be careful, it might spit a bit).
  • When the oil begins to sizzle, carefully spoon in a layer of rice to cover the base.
  • Quickly mix the peas with the remaining rice and then gradually, spoon by spoon, build a pyramid of rice over the base of rice in the saucepan.
  • Poke five or six holes into the pyramid using the handle of a wooden spoon to allow the steam to escape.
  • Sit the garlic and lemon peel on top of the rice.
  • Drizzle the melted butter and water evenly over the rice.
  • Wrap the sauce pan lid in a tea towel, being careful to tuck it in so none of the towel ends up burning on your stove, and cover the pan with it.
  • Leave the rice on a high heat for two to three minutes until steam is escaping from the sides of the pan, then turn the heat to low and leave for 40 minutes without opening the lid to check on it.
  • Meanwhile, season the flour with salt and pepper, toss the onions in it, and fry in a tablespoon or two of neutral oil over a medium heat for 20-25 minute until golden brown and crispy.
  • When you are ready to serve, put the saucepan into a basin of cold water to separate the crispy rice from the pan.
  • Stir through most of the pistachios and  the chopped dill, saving a bit of both for the top.
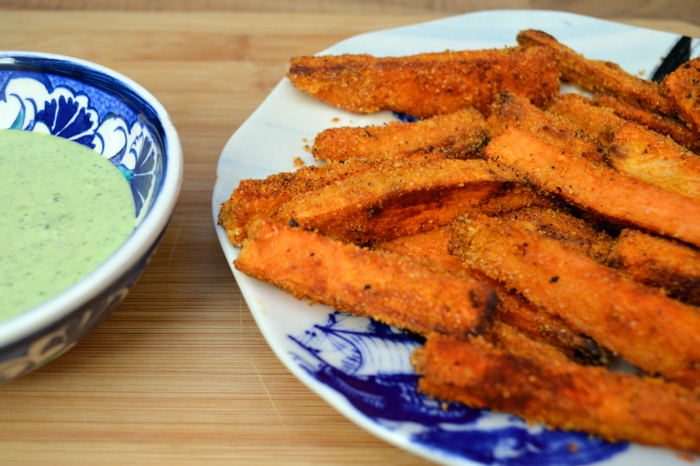
 

Smoky Sweet Potato Fries with Feta, Burnt Lemon and Wild Garlic Dip

DSC_0334

This recipe is inspired by two Dublin sister restaurants, JoBurger and Crackbird. JoBurger was the first place I ever tried sweet potato fries, and I’m pretty sure the first place that sold them in Dublin, back in the dark days at the end of the Celtic Tiger. It was a pioneer of the casual gourmet fast food scene. It was and is a place where the menu told you they had put a lot of care and attention into it, but it was served in a setting where the music, decor and nonchalant staff feel more at home in a club. A lot of places offer this now, but JoBurger to me remains the best for a very simple reason: they know their food (with a hat-tip to Bunsen, another Dublin burger place that keeps their food game on point).Dublin is rife with gourmet fast food places passing off frozen oven chips, supermarket burger buns and pulled pork slathered in hot sauce to disguise the lack of flavour who looked at the business model, but forgot to factor in the food knowledge. 

This recipe recreates the sweet potato fries from JoBurger with the whipped feta dip from Crackbird. The sweet potato fries are a little different, coated in polenta to keep the outside crispy, and smoked paprika and chilli to add a bit of heat. Feel free to add more paprika, I use even more than this when I’m making these for myself, but not everyone is as mad for it as I am.  If you can’t find wild garlic, you can substitute with a finely chopped clove of garlic.

Serves 4 as a generous side

Ingredients:

  • 2 x large sweet potatoes (about 1.5kg in weight)
  • 4 tablespoons polenta
  • 3-4 teaspoons sweet smoked paprika
  • 1-2 teaspoons of chilli flakes (optional, I use mild pul biber flakes)
  • Neutral oil e.g. sunflower or rapeseed
  • 200g feta
  • 2-3 tablespoons Greek yoghurt
  • 1/2 large lemon
  • Small bunch wild garlic (15-20 leaves)
  • A handful of spinach leaves
  • 1 teaspoon honey

Method:

  • Preheat the oven to 190C.
  • Peel the sweet potatoes and cut them into finger sized wedges.
  • Mix the polenta and paprika together with a decent amount of salt and pepper.
  • Toss the sweet potato fries in a large bowl with 1-2 tablespoons of neutral oil, then add in the polenta mix and toss well to coat the fries.
  • Lay them out on foil lined baking trays so that none of the sweet potato fries touch each other (you will need to do this in batches) and roast in the oven at 190C for about 20 minutes until the fries are crispy and browned on the outside, and soft in the middle, carefully turning them halfway through so they crisp evenly.
  • Meanwhile, burn the lemon half on a hot pan until blackened and completely soft on the cut side (you can also skip this step and use the lemon juice straight up).
  • Crumble the feta into a bowl with the yoghurt, wild garlic and spinach and blend with a stick blender until smooth.
  • Add the juice of the burnt lemon, and the honey to taste (I like things very citrusy, so I usually scape all the lemon flesh in, add it slowly until you get the taste you like).
  • Serve with the warm sweet potato fries.

Incredibly Easy Tomato and Fennel Bread

april2 001_phixr(1)

Over the past few weeks, I have been making the transition from studying all hours of day and night combined with two part-time jobs, to a more leisurely life working a part-time job that currently involves sitting around a room complaining about the industrial conflict which  prevents me from doing my job. It’s been a challenge. To fill the void in my life that was once filled with making flashcards, I’ve turned to making bread. Having a loaf of fresh bread on the table feels like an achievement. It gives the impression that you have something to show for a day that has mainly involved flicking between The Guardian, Broadsheet and old episodes of The Colbert Report, interspersed with napping. Moreover, being able to make bread seems to be an intrinsic part of Danish culture.  Most young Danish people I’ve met make their own, and every supermarket will sell both fresh and dried yeast. I saw this recipe on Food 52 (originally from Jim Lahey’s ‘My Bread’) and decided I had to try a recipe that compared making bread to having a pet cat. It requires minimum effort, a little bit of waiting, and given that I have used it six times with five perfect results, and one almost perfect result*, I would have to say it is foolproof. I’ve adapted a plain loaf to make a tomato and fennel loaf, which is fantastic with some very seasonal wild garlic pesto and a schmear of goats cheese. This makes a decent 500g loaf, and just requires you to plan a day ahead.

*This recipe is designed for white flour. If you use wholemeal flour you will get a denser loaf that doesn’t rise as much. A 50/50 mix yields good results.

bread 005_phixr

Ingredients

  • 400g white flour
  • 300ml cold water
  • 1 1/4 teaspoon salt
  • 1g (1/4 teaspoon) dried yeast, or 3g fresh yeast
  • 1-2 tablespoons fennel seeds
  • 2 tablespoons tomato puree
  • 2-3 tablespoons finely chopped sun dried tomato

Method

  • Put the flour and salt in a large bowl.
  • Dissolve the tomato puree and yeast in the water.
  • Stir into the flour with a wooden spoon until you have a dough.
  • Mix in the fennel seeds and sundried tomato.
  • Cover the bowl with a tea towel and leave for 12-18 hours covered (it will rise massively).
  • Take it out of the bowl with floured hands, and knead together for a minute or so on a floured surface until it forms a coherent ball coated in flour.
  • It will still be more sticky than you think is right, but it is, you don’t need to add more flour.
  • Wrap in a tea towel and leave for 1-2 hours.
  • It’s ready when you stick your finger in it and it leaves an indentation.
  • During the last half hour or so of this, put a big casserole dish (apparently called a Dutch oven in the States?) or metal pot with a lid big enough to fit the dough almost doubling in size) in the oven at 250C to preheat.
  • When the dough is raised, shape it into a loaf.
  • Dust the now heated pot (carefully) with flour.
  • Add the loaf to the heated pot and put in the oven with the lid on for 30 minutes.
  • Take off the lid and cook in the oven for about another ten minutes, until the outside is crispy and golden brown.
  • Remove from the oven and leave to cool on a wire rack for 30-45 minutes.

bread 014_phixr

Green Goddess Dip

green goddess 002_phixr

This post would perhaps be better entitled the triumph of hope over experience. It is mid-March and snow is whirling outside my window. This morning Rene Redzepi tweeted a picture of snow covered patio chairs and announced spring had come to Copenhagen. Up in Aarhus we are on snow warnings so severe there are threats that schools and businesses will close (I did not think an actual snow day was possible in Denmark). And yet, despite this, I have just bought a basil plant. For my herb garden. The herb garden I have been attempting to cultivate on my window sill. Through a Scandinavian winter. Let that sink in for a minute…

This will be my fourth basil plant. I am currently nursing the fifth mint, third thyme, and god only knows what parsley. I have come to accept that dill will be an unrequited love. I have a valiant, tragic, moribund tarragon plant languishing in the corner like a consumptive Belle Époque heroine. It was the only plant waiting for me after a weeks holiday in Holland, and now in the last throes of winter, it is giving up the ghost. I like to think of my herb garden as the triumph of hope over experience, but more likely it is just undeniable evidence that I am an absolute eejit. If you are lucky enough to live further from the Arctic tundra, or have a better grasp of horticulture, this dip is a lovely way to use up some herbs.

Makes a big cereal bowl party sharing sized amount.

Ingredients

  • 1 tablespoon chopped fresh parsley
  • 1 tablespoon chopped fresh basil
  • 1 tablespoon chopped fresh dill
  • 1 tablespoon chopped fresh tarragon
  • 3-4 tablespoons crème fraîche or sour cream
  • 1 tablespoon mayonnaise
  • 1 tablespoon buttermilk (optional)
  • 1 teaspoon sugar (optional)
  • 1/2 to 1 tablespoon white wine vinegar
  • 1 ripe avocado
  • 1 chopped shallot
  • 1 chopped garlic clove
  • Salt and pepper

Method

  • Blend all the ingredients in a large bowl with a stick blender.
  • Use your own judgement and taste to decide how much vinegar to add in and whether or not to add a bit of sugar.
  • Season according to taste and serve.

green goddess 007_phixr

Hake with Hazelnuts and Capers

nov4 005_phixr
As befits early January, this recipe from Epicurious is both quick and healthy. I am still slowly developing a taste for fish after years of fear and loathing, and hake is my favourite so far. As a child, my mother always warned me that one day as a grown-up, I would be in a social situation where it would be impolite not to eat fish, so I should try to get used to it. This has yet to turn out to be the case, but a gradual process of peer-pressure from my significant other combined with curiosity has led me down this path. I suspect my dislike of salmon will be eternal, despite this being one of the few fish Irish people seem to actually eat, but I am slowly getting to grips with white fish. This recipe would work with other firm white fish like cod or halibut just as easily. Serves 4.

Ingredients

  • 4 pieces hake fillet
  • 60g hazelnuts
  • 2 tablespoons extra-virgin olive oil
  • 1 tablespoons unsalted butter
  • 1 garlic clove, finely chopped
  • 2 tablespoons red-wine vinegar
  • 2 tablespoons water
  • 2 tablespoons drained tinned or fresh capers
  • 1 small bunch chopped fresh flat leaf parsley

Method

  • Finely chop the hazelnuts.
  • Dry the hake pieces with kitchen paper and season with salt and pepper.
  • Heat the oil in a large frying pan over medium-high heat.
  • Saute the fish, turn it once halfway through, until it is golden and cooked through approx
  • Transfer to a warmed plate and cover with tinfoil to keep warm.
  • Melt the butter in the same frying pan, and add the hazelnuts.
  • After 1 minute add the garlic to the hazelnuts and continue to toast until the hazelnuts are golden brown.
  • Add the vinegar and water to deglaze the pan.
  • Remove from the heat and add the capers and parsley.
  • Season, and serve spooned over the hake.

Mushrooms à la Crème

This is a very simple multipurpose dish adapted from a Ballymaloe recipe. Mushrooms, like everything else I once hated, then grew to tolerate, have now become an addiction and a fairly constant part of my diet. This is cheap, relatively healthy (I tend to use half fat crème fraiche) and very tasty. It can be used as a sauce for meat or chicken, as side vegetable. as a pasta topping, or as a dolled up topping for mushrooms on toast (its very nice with Scandinavian rye bread or brioche). It is also nice with the addition of a handful of grated parmesan or some truffle oil. This makes enough for two as a side dish or sauce.

Ingredients

  • 250g mushrooms mixed (I usually use a combination of chestnut, forestiere and portobello)
  • 1 onion or 2 shallots
  • Juice of ½ lemon
  • 3 tablespoons crème fraiche
  • Crushed black pepper.
  • Fresh herbs
  • Olive oil

Method

  • Chop the mushrooms into 1cm chunks and finely chop the shallots.
  • In a large saucepan, gently cook the shallots in a little olive oil over a low medium heat for about 10 minutes until well softened.
  • Meanwhile, fry the mushrooms in a frying pan for 3-5 minutes until browned around the edges and the liquid which seeps out has evaporated.
  • Add the mushrooms to the onions and squeeze over the lemon juice.
  • Add the crème fraiche, season very well and cook for a few minutes until the crème fraiche is thickened and the ingredients are well combined.
  • Stir in the herbs, top with fresh black pepper.
  • Serve immediately (this also refrigerates and reheats well).

Wasabi and White Chocolate Cupcakes with Salted Caramel Icing

This is an unusual recipe, and one which caught my eye from an unlikely source. I have never been a huge fan of celebrity cookbooks, nor have I ever read a chicklit book, so when I was given Marian Keyes baking book as a gift I was more than a little bit surprised. However, on leafing through it I found a selection of unusual recipes with great, very clear instructions and I’ve had to revisit my celebrity cookbook bias. This recipe I just had to try, because if someone is willing to put a wasabi cupcake recipe in a book, they are either mad or a genius and I wanted to find out which. The answer seems to be genius. The crumb was rich, dense and a little bit moist, and the flavour pretty unusual. It is a really nice twist on the now fairly pedestrian chilli/chocolate combination. I am a fan of anything salted caramel flavoured so I gave the icing a whirl, but to be honest these are also perfectly presentable and tasty without if it sounds like too much effort.

Makes 12

Ingredients

  • 100g white chocolate
  • 100g unsalted butter
  • 110g caster sugar
  • 1 teaspoon vanilla extract
  • 75g self-raising flour
  • 1 teaspoon baking powder
  • 3 eggs
  • 1 teaspoons wasabi paste
  • salt

For the icing

  • 100g butter
  • 75 brown sugar
  • 75g golden syrup
  • 1 teaspoon vanilla extract
  • 1 teaspoon sea salt

Method

  • Melt the white chocolate over a bain marie.
  • Stir in the butter until melted and well combined.
  • Remove from the heat and stir in the sugar.
  • Marian says its ok if it looks congealed, mine more just didn’t mix in together properly, but both these things are fine.
  • Leave for 10 minutes to cool.
  • Add the vanilla extract and use an electric mixer to mix for 3 minutes (or until everything comes together nice and blended).
  • Add the eggs one by one, mixing each in well.
  • Add the flour, baking powder and a pinch of salt and stir well.
  • Stir in the wasabi.
  • Pour into 12 cupcake papers in a cupcake tray and bake at 180C for 20ish minutes (keep an eye after about 13, when they are risen properly and slightly coloured on top, and a skewer comes out clean, they are done).
  • Leave to cool and make the icing.
  • Melt all the icing ingredients together except the salt.
  • Raise the heat until it bubbles, but doesn’t boil, and whisk vigorously until it is thickened (mine took about 6 minutes).
  • Leave to cool slightly, for about 2 minutes, then use to ice the cupcakes.

Courgette (Zucchini) Carpaccio

This recipe is completely shamelessly copied from the Konobo Menego on Hvar in Croatia, after I overheard a waiter describe it to a fellow diner. Our meal there was probably the highlight of the trip to Hvar, along with being told by two separate people that my choice of drink was not suitable for a lady.  We managed to coincide with a massive rainstorm and the coldest days on record that year in Croatia (despite it being May and Hvar being famed for its year-long sunshine). It seems that rain in Croatia is taken as an excuse to skive off work, being the exact opposite of Ireland and the UK where sunshine causes everyone to spend all day lying in the sun like cats. Everything on the island closed, even the museum and churches, with the exception of a couple of restaurants and the supermarket.

Food in Croatia has quite an Italian influence, due to quite a lot of time under the control of the Venetian Empire, and this dish is a good example of that. It is very quick and easy to make, and can also have its component parts sorted out earlier in the day and be put together at the last minute. It is a great Summer starter or as a part of an antipasta. It is not strictly vegetarian, given the inclusion of parmesan, but a good strong cheddar could work as a veggie substitute.

Serves 2 as a starter, or 4 as part of an antipasta selection

Ingredients

  • 2 small courgettes
  • 1 tablespoon grated parmesan or vegetarian substitute
  • ½ tablespoon toasted pine nuts
  • ½ tablespoon toasted pistachios
  • 1 small finely chopped shallot
  • 1 tablespoon olive oil
  • ½ tablespoon balsamic vinegar
  • 1 teaspoon grated lemon zest (optional)

Method

  • Trim and wash the courgettes.
  • Thinly slice the courgettes into ribbons, or peel using a vegetable peeler or mandolin.
  • Steam, or blanche in boiling water for 1 minute.
  • Refresh with cold water and leave to dry in a colander.
  • Pat dry with kitchen paper once it has cooled.
  • Mix the oil, vinegar and lemon zest to form a dressing.
  • Lay the courgette slices on a plate and drizzle over the dressing.
  • Top with the shallot, grated cheese, pine nuts and pistachios.
  • Season well and serve.

Pearl Barley Risotto with Mushrooms, Wild Garlic and Truffle Oil

Another wild garlic recipe just before the season is well and truly up (this can easily be made with regular garlic either). This is a handy lunchbox recipe, at it is easy to make a few portions at a time, and keeps and reheats well. Pearl barley creates a similar fluffy texture to risotto rice if cooked properly, and is cheaper (although Tesco seems to vary its prices wildly from week to week from 35p to 69p which although not a lot is nearly doubling the price with no explanation). The jury is still out on whether it is healthier.

There are wildly different instructions as to how long to cook pearl barley for. I have seen anything from 20 to 45 minutes. I find the best results around the 35 minute mark, keeping it covered with stock and simmering for the first 30 minutes, and then having five careful minutes at the end where you allow the remaining stock to be cooked and absorbed, stirring frequently (and taking a bit to taste to make sure it is ready).Unlike risotto, I have seen no particular benefit or effect from adding the stock gradually.

I know parmesan is traditional for risotto, but since this isn’t proper risotto, a nice crumbly mature cheddar, blue cheese, or goats cheese all work very nicely with the flavours if you don’t have any parmesan to hand. Truffle oil is a bit decadent, but quite a good investment for this as a little goes a long way (I am into my 5th month with a 100ml bottle and it still has 75% left).

Serves 4.

Ingredients

  • 350g fresh mushrooms
  • 25g rehydrated wild mushrooms
  • 200g leeks
  • 100g cheese
  • 275g pearl barley
  • 100ml white wine or sherry
  • 1 handful wild garlic
  • 30g butter
  • About 500-750ml stock
  • Olive oil
  • 2 teaspoons of truffle oil (optional)

Method

  • Finely chop the leeks, and sauté in a large saucepan over medium-low heat in a little olive oil until softening and colouring a bit, about 5 – 7 minutes.
  • Meanwhile, wash and roughly chop the wild garlic.
  • Add to the saucepan and allow to wilt (about 3 minutes).
  • Add the pearl barley and stir well to incorporate flavours.
  • Add the wine and cook down until completely reduced and absorbed.
  • Pour in enough stock to cover the pearl barley by about 1-2cm.
  • Leave to simmer, stirring occasionally for 30 minutes.
  • Meanwhile, wash and roughly chop the mushrooms.
  • Saute in a frying pan with a little oil over a medium heat until cooked, about 8-10 minutes depending on how well done you like them (I like mine quite browned to get a proper nutty flavour from them).
  • Season and cover with tinfoil to keep warm.
  • After 30 minutes of cooking the barley, reduce the heat until it is gently bubbling and stirring regularly, cook until almost all of the liquid is absorbed.
  • Add the mushrooms, cheese, butter, and truffle oil (if using).
  • Season well and serve.

Gougères – Three Ways


Gougères are small cheesy puffs of choux pastry, usually served with a pre-meal glass of wine. They are traditionally from Burgundy, where I tried them when I was a child. I then promptly tried to forget about them, as they seemed too decadent and addictive to safely have in my life. I don’t have a huge sweet tooth, although I love making desserts, but I find cheese to have the same addictive qualities  more traditionally associated with crystal meth or crack. I made quite a large quantity of these, so decided to play around with a couple of different types, so a third were traditional, a third with fennel seeds and a third with cayenne, all of which were great (though I think the fennel was my favourite). I used a mix of strong cheddar and parmesan, although gruyere, emmental or comte are meant to be more traditional. These are additionally dangerous because they are quite easy to make, and turned out beautifully light and crisp on my first go. They also freeze very well while baked, so are a handy thing to make ahead. Leave them to cool after baking, and freeze on a baking tray. Once they are frozen through, they can be put into ziplock bags but don’t freeze them this way initially as they will stick together. To reheat, just bake in the oven at 160° until warmed through (about 3-5 minutes). This makes quite a lot, about 50 bite size  gougères.

Ingredients

  •  125ml water
  • 125ml milk
  •  120g finely grated cheese
  •  4 large eggs
  •  150g flour
  • 110g butter
  • Pinch nutmeg
  •  1-2 tablespoon fennel seeds
  •  2 teaspoons cayenne pepper
  •  Salt and Pepper

Method

  • Preheat the oven to 180°.
  • In a medium saucepan, bring the water, milk, butter and salt to a boil.
  • Mix in the flour and stir to combine.
  • Cook for about 2 minutes until it has formed an elastic dough which is coming away from the sides of the pan, much like a roux.
  • Place the dough in a bowl and leave to cool for a minute so that your eggs won’t scramble when added.
  • Add each egg one at a time, mixing to incorporate well (this stage looks a bit disgusting, and like it is curdling, but it isn’t so just keep going and it will look great in the end).
  • Stir in 100g of cheese and add the nutmeg and some salt and pepper. 8. Add the dough to a piping bag (or just a ziplock bag with the corner tip cut off).
  • Pipe  in approx 1 inch circles onto a lined baking sheet, allowing a bit of space between each, although they do not spread out hugely.
  • Sprinkle all with the remaining cheese.
  •  Sprinkle some with fennel seeds and some with cayenne.
  •  Bake for approximately 20 minutes, until puffy and golden brown (keep an eye on them from about 14 minutes on).