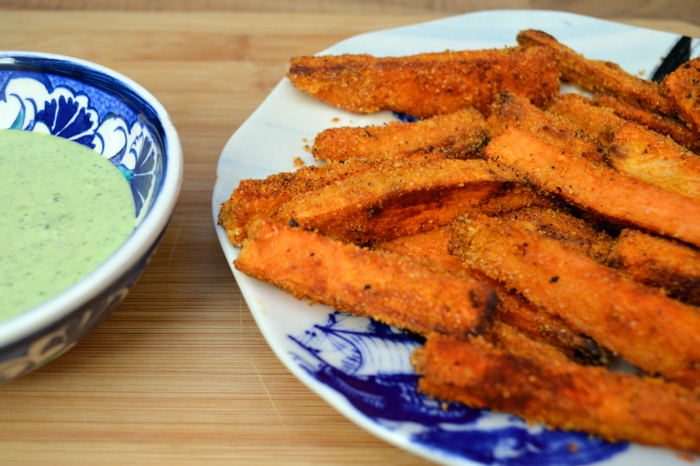
Smoky Sweet Potato Fries with Feta, Burnt Lemon and Wild Garlic Dip

DSC_0334

This recipe is inspired by two Dublin sister restaurants, JoBurger and Crackbird. JoBurger was the first place I ever tried sweet potato fries, and I’m pretty sure the first place that sold them in Dublin, back in the dark days at the end of the Celtic Tiger. It was a pioneer of the casual gourmet fast food scene. It was and is a place where the menu told you they had put a lot of care and attention into it, but it was served in a setting where the music, decor and nonchalant staff feel more at home in a club. A lot of places offer this now, but JoBurger to me remains the best for a very simple reason: they know their food (with a hat-tip to Bunsen, another Dublin burger place that keeps their food game on point).Dublin is rife with gourmet fast food places passing off frozen oven chips, supermarket burger buns and pulled pork slathered in hot sauce to disguise the lack of flavour who looked at the business model, but forgot to factor in the food knowledge. 

This recipe recreates the sweet potato fries from JoBurger with the whipped feta dip from Crackbird. The sweet potato fries are a little different, coated in polenta to keep the outside crispy, and smoked paprika and chilli to add a bit of heat. Feel free to add more paprika, I use even more than this when I’m making these for myself, but not everyone is as mad for it as I am.  If you can’t find wild garlic, you can substitute with a finely chopped clove of garlic.

Serves 4 as a generous side

Ingredients:

  • 2 x large sweet potatoes (about 1.5kg in weight)
  • 4 tablespoons polenta
  • 3-4 teaspoons sweet smoked paprika
  • 1-2 teaspoons of chilli flakes (optional, I use mild pul biber flakes)
  • Neutral oil e.g. sunflower or rapeseed
  • 200g feta
  • 2-3 tablespoons Greek yoghurt
  • 1/2 large lemon
  • Small bunch wild garlic (15-20 leaves)
  • A handful of spinach leaves
  • 1 teaspoon honey

Method:

  • Preheat the oven to 190C.
  • Peel the sweet potatoes and cut them into finger sized wedges.
  • Mix the polenta and paprika together with a decent amount of salt and pepper.
  • Toss the sweet potato fries in a large bowl with 1-2 tablespoons of neutral oil, then add in the polenta mix and toss well to coat the fries.
  • Lay them out on foil lined baking trays so that none of the sweet potato fries touch each other (you will need to do this in batches) and roast in the oven at 190C for about 20 minutes until the fries are crispy and browned on the outside, and soft in the middle, carefully turning them halfway through so they crisp evenly.
  • Meanwhile, burn the lemon half on a hot pan until blackened and completely soft on the cut side (you can also skip this step and use the lemon juice straight up).
  • Crumble the feta into a bowl with the yoghurt, wild garlic and spinach and blend with a stick blender until smooth.
  • Add the juice of the burnt lemon, and the honey to taste (I like things very citrusy, so I usually scape all the lemon flesh in, add it slowly until you get the taste you like).
  • Serve with the warm sweet potato fries.

Spaghetti with Mussels and Tomato

Mussel Pasta


It’s getting to that time of year again. There was not a hint of sun over the entire May bank holiday, and the fear is growing that the next few months will revert to the more traditional Irish summer of crisp sandwiches eaten in cars looking at rain sodden beaches and hypothermia from trying to swim in July. My thoughts are turning to holidays and sunshine, and with them, this perfect holiday dish.

You know those amazing pasta dishes you get in Italy, that look so simple,but have incredible depth of flavour. This is one of those.  If you turn up the central heating, close your eyes, and stick a Fellini film on for background noise, you can almost pretend you can’t hear the rain on the roof. 

This dish is also a great way to use up extras if you’ve had to buy mussels in 2kg bulk packs. Around 10 mussels per person is perfectly adequate, but if you have more, go for it. It would also be lovely made with fresh tomatoes, if you can get the really good juicy ones that never quite seem to make it as far as Irish shops. I also usually serve this with a bit of grated parmesan, but I know a lot of people think cheese and fish are weird, so to each their own.

Serves 2

Ingredients

  • 2o mussels, cleaned and checked
  • 125ml white wine
  • 1 small onion, finely chopped
  • 4 cloves of garlic, finely chopped
  • 1 tin of chopped tomatoes (Italian preferably, they really do taste better)
  • A pinch of sugar
  • A pinch of chilli powder (or more if you like things spicy)
  • Salt and pepper
  • Olive Oil
  • 1 Tablespoon chopped fresh parsley (optional)

Method

  • Saute the onion with a little olive oil in a medium frying pan over medium heat for 10 minutes until softened, but not coloured.
  • Add the garlic and cook for 2-3 minutes, stirring frequently to make sure it doesn’t burn.
  • Meanwhile, in a large pot with a lid, bring the wine to the boil.
  • Add the mussels, and cook for 3-4 minutes until all are open (one or two may stay closed, if they do, discard them).
  • Add the tomatoes to the garlic and onion.
  • Strain the mussel cooking liquid and add gradually to the tomato sauce.
  • Cover the mussels with tinfoil and keep warm.
  • Cook the tomato sauce over a medium-high heat in the frying pan until reduced and with a thick paste consistency(approximately 10-12 minutes).
  • Meanwhile, cook the spaghetti in boiling salted water.
  • Add the chilli, sugar, salt and pepper to the tomato sauce and adjust the seasonings to your taste.
  • Add the mussels for the last minute or two of cooking the sauce.
  • You can either remove them from their shells, or leave them in. I like to go 50/50.
  • Drain the pasta, but don’t dry it too thoroughly, and mix it with the mussels and sauce
  • Garnish with chopped parsley if using.
  • Serve immediately.


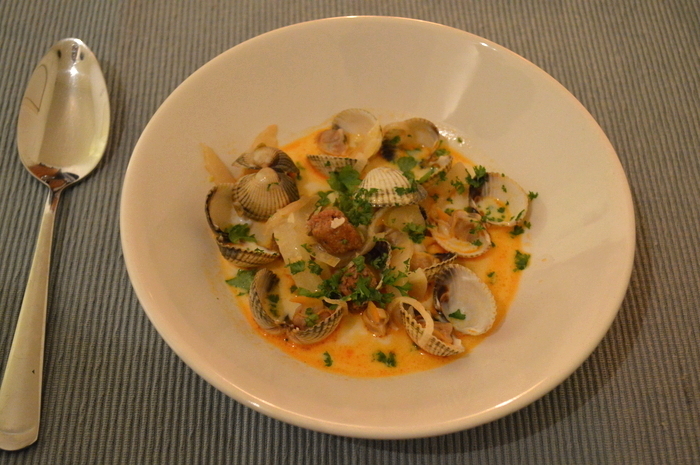
Drunken Cockles

Drunken Cockles


Cockles have a pretty longstanding association with Dublin, thanks to Molly Malone. Every schoolchild in Ireland (and Denmark apparently) learns it in school, although the bit about her being a lady of the night on the side is usually glazed over. I didn’t realise it had such international appeal until I came across a busker singing it at Dupont Circle on my first night in Washington DC last week.  You don’t see cockles much in Dublin these days, possibly due to the rumour that they were in fact the cause of Molly Malone’s death, but you can visit her decidedly voluptous  statue instead (nicknamed ‘the tart with the cart’ in true Dublin fashion).

I’ve actually only spent about a week of the last month in Dublin, so this recipe actually comes from my recent time in Holland, and combines Dutch cockles with spicy Turkish lamb sausage. Lamb and seafood may seem like an odd combination, but apparently it’s traditional in Wales, and does actually work well together, so bear with me. The recipe is adapted from Food 52. It serves 2 as a main meal with crusty bread, or 4 as a starter portion.


Ingredients

  • 500g cockles
  • 5 cloves of garlic, finely chopped
  • 2 shallots, sliced
  • 1/2 head of fennel, thinly sliced
  • 2 spicy lamb sausages, skins removed and sliced into small chunks
  • 250ml white wine
  • 150ml cream
  • Chopped fresh parsley (optional)

Method

  • Soak the clams in a large bowl filled with salty water and leave for twenty minutes.
  • Strain and repeat this three times to get out all the grit.
  • Heat some olive oil in a large saucepan over low-medium heat and saute the shallot and fennel for 10-15 minutes until soft.
  • Add the garlic for the final three minutes.
  • Add the sausage meat, increase the heat a bit and cook until browned all over (about five minutes).
  • Add the wine and bring to the boil.
  • Add the cockles, cover with a lid and cook for five or six minutes until they are open.
  • Add the cream for the final two minutes of cooking.
  • Sprinkle with parsley and serve with some nice bread (you won’t need to season it, the cockles are very briney)

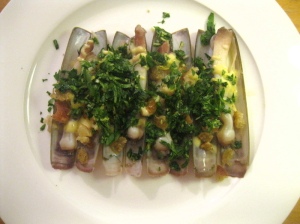
Razor Clams with Gremolata, Crispy Breadcrumbs and Aioli

Razor Clams

When I lived in Leiden, one of my favourite things about the weekend was wandering around the market that takes over the main canal through town on a Saturday. The only part I skipped over was the one corner of the market was dedicated entirely to fish. This part of the market sold all kinds of fresh fish to cook, as well as raw herring you eat whole in much the same way as you would down a shot and kibbeling (miscellaneous deep fried white fish). All of this is presided over by some ever watchful seagulls, who will happily grab the food out of your hands given half the chance.

Now that I’ve been converted to fish, I love browsing all the stalls to see what unusual things they have on offer. On my last visit, after careful examination of the stands, we bought a bundle of razor clams, never having tried them before, and unsure of what to do. When I googled razor clam recipes, I was a little concerned that they all mentioned discarding any clams that were open. All of the clams we’d bought were open, with the clams sliding out one end. Just as I was starting to wonder if we’d been duped, a piece by Giorgio Locatelli came to the rescue, explaining that the best way to tell if the clams are alive or not is to tickle the feet. We tentatively tried this with one clam which immediately leaped away. We ended up with an entire plate of clams wriggling and jumping in their shells. It was a little bit creepy, but at least we knew they were fresh.

Serves 2 as a light meal with bread.

Ingredients

  • 350g razor clams
  • 3 garlic cloves, chopped
  • 150ml white wine
  • 3 tablespoons chopped fresh parsley
  • 1 tablespoon grated lemon zest
  • 3 slices of crusty bread, torn into very small pieces
  • 1/2 quantity aioli
  • olive oil

Method

  • Clean the razor clams.
  • Check to make sure they are alive by tickling the bit of the clam sticking out from the shell; it should quickly recoil.
  • Make the aioli as per the linked instructions.
  • To make the gremolata, mix the parsley, lemon zest and 1 teaspoon of finely chopped garlic.
  • Fry the bread crumbs in 1 tablespoon of olive oil over medium high heat until crispy.
  • In a large pan with a lid, fry all but one teaspoon of the chopped garlic in some oil until it starts to colour.
  • Add the wine and bring to the boil.
  • Add the clams, put on the lid and cook for three minutes.
  • Remove the clams after three minutes, and serve drizzled with a little of the cooking liquid and topped with the gremolata, breadcrumbs and aioli.

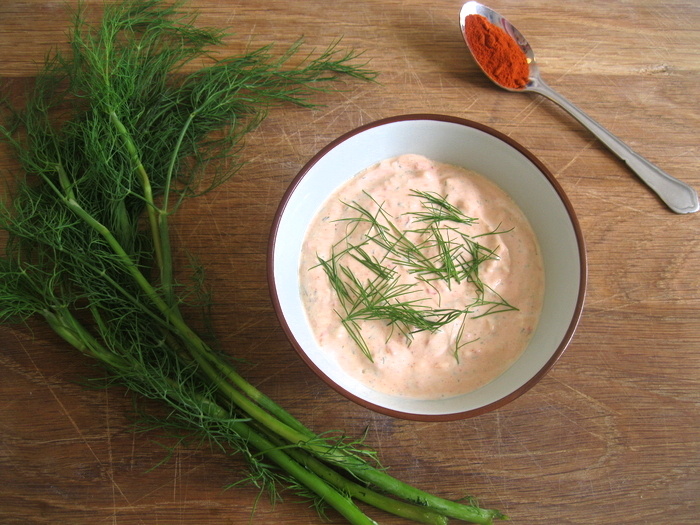
Smoky Haydari with Feta and Red Pepper

Haydari

Haydari is a traditional Turkish meze made from thickened yoghurt, garlic and herbs. I first tried it in the beautiful, blue-tiled dining room of Karakoy Lokantasi in Istanbul last year. It was a nice end to a stressful day. My travelling partner missed his initial flight to Istanbul, and ended up booking a last minute one with the Ukrainian equivalent of Ryanair. This involved a 1 hour transfer in Kiev airport. Four hours after the appointed arrival time, he was still AWOL and many different unpleasant scenarios involving corrupt police, local crime-lords and/or terrorists were playing through my head. When he finally did arrive, a decent relaxing meal was in order.

You will frequently see haydari sold in Turkish delis in various different forms, often involving feta. I used to stock up every time I went to my local one, until I realised how easily it could be made. Over the Summer, I often had this as a quick lunch with some flatbread and crudites. It only takes a few minutes to whip up, so it would also be good for last minute guests. The flavours are not necessarily traditionally Turkish, but they are delicious. This makes a good sharing portion.

Ingredients

  • 200g Turkish suzme yoghurt or thick Greek yoghurt
  • 60g feta, crumbled
  • 1 tablespoon chopped fresh dill (you can use dried either really)
  • 1 finely chopped garlic clove
  • 1 teaspoon smoked paprika
  • 1 roasted red pepper (from jar)
  • 1 teaspoon honey
 Method
  • Blend all the ingredients with a stick blender until well combined.
  • Serve chilled.

Baked Pea and Goats Cheese Arancini

Arancini are a traditional Sicilian dish found throughout the south of Italy. They consist of deep fried balls of breadcrumb coated risotto, usually wrapped around a filling of ragu sauce or cheese. During a week-long stay in Otranto in Puglia, my meals were about 70% arancini based.

They are a really great way to use up leftover risotto, and are good things to make ahead as canapés or as part of an antipasti. I had steered clear of trying to make them as I try generally not to make deep fat fried food in case my brain finally connects how much fat actually goes into it, and I stop eating it altogether, preferring to live in blissful denial when ordering fried food in restaurants. So when I saw a post over at Frugal Feeding about making baked arancini, I decided to give it a whirl myself.

Baking still delivers a nice crispy coating which breaks into the warm gooey rice and cheese below, and is a lot less time consuming (both in making them and in detrimental impact on your life expectancy). They trick is you really need to make the risotto rice the night before (or at least leave it to sit for two hours) so it is a bit more gummy and easy to shape. I used my previous recipe for pea, mint and pancetta risotto, which can be found here.

Makes 8 largeish arancini (about the size of a Satsuma)

Ingredients

  • 200g pea, mint and bacon risotto
  • 60g soft goats cheese
  • 75g (approx.) breadcrumbs)
  • 30g flour
  • 1 egg
  • Olive oil

Method

  • Preheat the oven to 180C.
  • The easiest way to make the arancini is to use two large soup spoons and one small teaspoon (this will get messy).
  • Scoop out a spoonful of risotto with the first large spoon and flatten slightly into the curve of the spoon.
  • Take a teaspoon of goats cheese, and add it into the dent.
  • Repeat the scoop/shape of risotto with a second large spoon and press the two spoons of risotto together so the goats cheese is in the middle of the ball surrounded by the risotto rice.

  • You can keep these as sphere shapes, or shape them into more of a pear shape so they sit easily on a baking tray.
  • Take three bowls and put the flour in the first, the beaten egg in the second, and breadcrumbs in the third.
  • Season the flour.
  • Take each arancini and first coat it in flour, then egg, then the breadcrumbs.
  • Place the completed arancini on a baking sheet lined with baking parchment (it is a good idea to slip another baking sheet to preheat in the oven, which will help the bases of the arancini crisp).
  • Drizzle with oil, or even better, spray with oil using a diffuser.

  • Bake at 180C for about 30 minutes, or until the arancini are crispy and golden all over.
  • Serve warm.

Roast Beetroot Tartlets with Fennel Marinated Feta

This is just a quick and simple canape or starter dish. While beetroot and goats cheese are the more traditional combination, the stronger saltiness of feta combines very nicely with the sweetness of the beetroot. The feta needs to be marinated a day or two in advance, in the fridge, however you should take it out an hour or two before using as the olive oil becomes slightly jellylike in the fridge. If you don’t have the time or inclination to roast beetroot, you can just buy the ready cooked vacuum packed stuff, cube it and pan fry it instead. I made this using bought shortcrust pastry, as I hadn’t attempted baking a tart in my terrible oven before, and didn’t want to find I’d wasted the time and effort of making my own if it didn’t work (especially as I was baking it in a muffin tray). I am told there are good brands of readymade pastry out there, but the one I used turned out to not be one of them, so I would suggest making your own (unless someone can recommend a good one?).

Serves 4

Ingredients

  • 100g feta, crumbled
  • Peel of 1 lemon
  • 2 teaspoon toasted fennel seeds
  • 3 whole raw beetroot
  • 1 tablespoon chopped dill
  • 1 tablespoon pinenuts
  • Olive oil
  • 1 pack shortcrust pastry

Method

  • To marinate the feta, store in a jar or sealable container, top up with olive oil until covered, and mix in the lemon peel and fennel.
  • Leave in the fridge for 2-3 days.
  • Roast the beetroot in a little olive oil at 200c until soft and slightly golden tinged on the outside, about 30-40 minutes.
  • Leave to cool, and chop into small cubes.
  • Cut the pastry into 12 discs (this will use most of a 375g pack) of pastry using a cutter or the rim of a large glass and bake blind as directed on pack using olive oil greased tartlet cases or a muffin tin.
  • Mix the beetroot cubes with the feta and some of the fennel seeds and season well.
  • Once the cooked pastry has cooled, top with the beetroot and feta mixture, and garnish with chopped dill and pinenuts.

Turkish Poached Sweet and Sour Leeks

I am not going to lie, I did expect something a little bit punchier from this recipe than these turned out to be. They are yet another recipe from my beloved Moro (from the Casa Moro cookbook). I was thinking these would have more of a biting agrodulce type taste or even a bit of a pickled dressing but no. Being brutally honest, these are very mildly flavoured poached leeks, and I would not subscribe to the cookbook’s suggestion of them as a light meal in themselves. What they were wonderful for, however, was as part of a tapa’s menu, to offset the inevitable smokey, porky flavours you will get with a decent selection of traditional tapas.They are mild, sweet and melt in the mouth. If you wanted to liven them up a bit as a side, some aioli or romesco drizzled on top would go down a treat. Serves 6-8 as a tapa.
Ingredients

  • 600g leeks, preferably the smaller, thinner ones
  • 3 garlic cloves
  • 3 teaspoons caster sugar
  • juice of 1 lemon
  • 300ml water
  • 1 bunch chopped flat leaf parsley
  • 1 bunch chopped fresh dill
  • olive oil
  • greaseproof paper

Method

  • Chop the garlic and saute in te oil i n a large saucepan.
  • Add the leeks, sugar, lemon juice, water and salt.
  • Cover with greaseproof paper, then a lid and simmer for 15 minutes or until soft, with the lid slightly ajar so a small crack of parchment paper is visible.
  • Stir in the herbs and season.

Broad Bean, Feta and Mint Quesadillas with Salsa

This is a rough guess at a dish I had in Wahaca in Soho (London) which has delighted me by being the first Mexican restaurant I have found in Europe which was A) not stupidly expensive and B) where the food actually managed to be fresh, light and distinguishable (for some reason Mexican food in Europe tends to end up being a miscellaneous amalgam of beans, cheese, sour cream and tomato, no matter what you order). I would guess that this is perhaps not the most authentic of Mexican dishes, as feta is not to my mind a traditional Mexican food, but it is a very tasty and quick meal. The beans adding a nice substance to it, while the mint keeps it fresh and light and not too stodgy. The salsa was not served with in Wahaca (recipe swiped, as ever, from the Ballymaloe Cookbook), but I like it to cut through and contrast a bit with the cheddar. This serves two as a meal with maybe a salad, or as a snack for 3-4.

Ingredients

For the quesadillas

  • 100g broad beans
  • 100g cheddar
  • 70g feta
  • 4-5 spring onions, finely chopped
  • 1 tablespoon of finely chopped fresh mint
  • 4 flour tortillas

For the salsa

  • 4 ripe tomatoes
  • 1 small chopped onion
  • 1 crushed clove of garlic
  • 1/2 fresh chili
  • 2 tablespoons chopped fresh coriander
  • 1 tablespoon lime juice
  • sugar

Method

  • To make the salsa simply mix all the ingredients together, seasoning with sugar, salt and pepper.
  • To make the quesadillas, grate the cheddar and crumble the feta in.
  • If frozen, boil the broad beans as directed on the pack (usually about 5 minutes).
  • Finely chop the mint and spring onion and mix together.
  • Divide the cheese between the four tortillas.
  • Fold the tortillas in half with the cheese in the middle.
  • Preheat a frying pan over medium-high heat. If the pan is not hot enough, the cheese will melt slowly and may separate a bit and become oily.
  • Toast the tortillas on a hot frying pan, approximately 30 seconds to 1 minute on the pan, until golden and crisp (it’s a good idea to keep flipping every 20 seconds or so to make sure neither side burns, you need quite a hot pan to toast and melt the cheese, so burning is a risk).
  • Cut the tortillas into wedges and serve with the salsa.

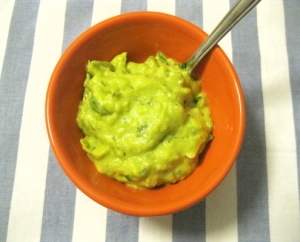
The Obligatory Cinco de Mayo Guacamole Recipe

Guacamole 005_phixr

I have, in fairness, only celebrated Cinco de Mayo once. And by celebrated, I mean I spent 93% of the celebration hiding in the bathroom of a Mexican restaurant in Melbourne which had inexplicably decided to celebrate by passing snakes and lizards out among the diners. I cannot be dealing with snakes. Especially in Australia. I am fairly sure in this case it was A)very unhygienic and B) probably ultimately responsible for a child getting bitten by one of the multitude of dangerous Australian snakes due to all the careful education on the perils of going near snakes being ruined by one badly thought out gimmick.

There appear to be a variety of schools of thought on guacamole involving various combinations of the smooth v chunky, spicy v mild , creamy v tangy, garlic v spring onion (a debate which has been ongoing between myself and a close friend, to the ire of all of the other friends who have to sit through it, for several years now). To clarify, I subscribe to the smooth, mild, creamy but also a bit tangy, spring onion school of thought on the subject. This will make a generous cereal bowl sized quantity.
Ingredients

  • 3 ripe avocados
  • 1 bunch spring onion, chopped
  • Juice of 1 lime
  • 1 bunch coriander (cilantro), chopped
  • 1 pinch cayenne pepper (or more if thats your thing)
  • 1 teaspoon paprika

Method

  • Blend the avocados using a handheld blender, or mash by hand if not available.
  • Add the other ingredients.
  • Refrigerate for an hour or so before serving to allow the flavours to mix.